

When you want to drive data analysis of all types including data science and business intelligence applications, loading weather data into a relational databased is often the first step. As one of the most popular database platforms in the world, Microsoft SQL Server is the backend datastore for millions of applications from homebrew to enterprise. In this article we will show various ways in which one can import weather data into SQL Server. And since there are multiple methods ranging from a full graphical user interface to SQL scripts to code, users of every level will be able to find a import option that is easy and accessible to their level of expertise.
Using the SQL Server Management Studio import wizard
The SQL Server Management Studio has a wizard interface that is the most common method used for importing data into SQL Server. If you prefer to use menus and wizards to interact with SQL Server, this is the option ideally suited for you.
As with any of the import options that we will discuss in this article, the first step is to download the weather data that you need. This is very easy to do using Visual Crossing Weather, and there is a step-by-step guide for both historical data and forecast data using the web query interface if you would like to follow along. Alternately, if you are planning to automate the process, you can use a command line tool such as cURL to make automatic queries to the weather server. You can follow this tutorial if you want to learn more about automating weather queries with cURL. Later in the article we’ll discuss options that use the weather API from code to generate even more powerful options.
Once you have the weather data that you need, your next step is to launch the Import Flat File Wizard by selecting “Import Flat File…” from the SQL Server Management Studio task interface. This will launch the import wizard. (It is worth noting here that if you prefer to load your weather data into Excel first for initial management or analysis, SQL Server Management Studio has the Import and Export Wizard that can load data directly from Excel. So, if you already have weather data loaded into Excel, you can load it directly without involving CSV. Simply launch the Import and Export Window from the Management Studio task interface and walk through the steps provided. They are similar to the ones shown below for CSV, but somewhat different due to the more self-descriptive nature of Excel data.)
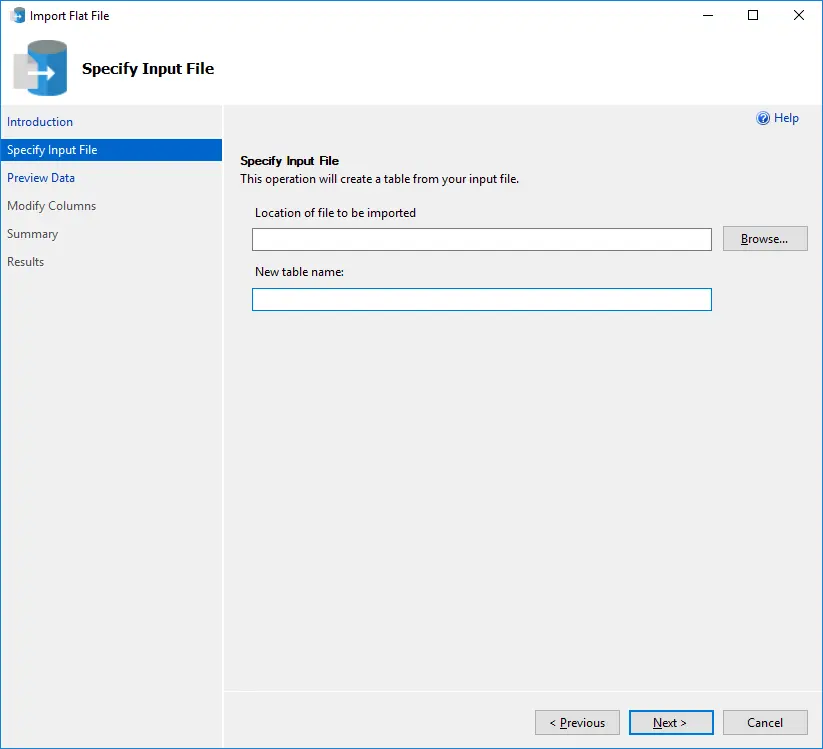
After the opening page of the wizard, you will be asked to specify the input file along with the table name. For the input file, simply use the “Browse…” button to locate the weather CSV file on your hard drive. For the table, you can type any valid table SQL Server table name that does not yet exist in your database. This is the table into which your weather data will be loaded.
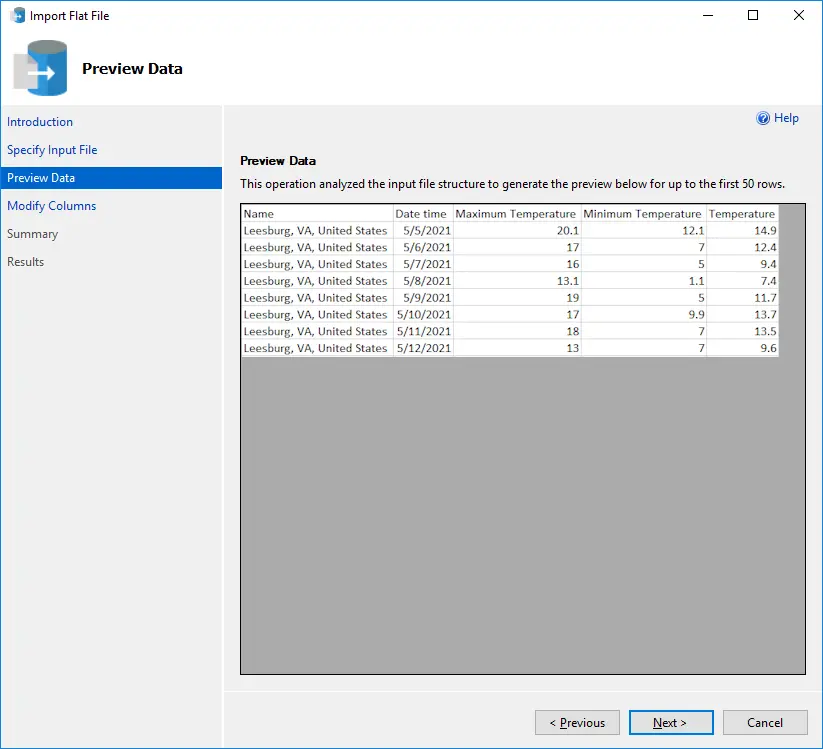
In the next step, the wizard will read the CSV file and show you the data that it finds to import. It will deduce that the top row contains header information while the remainder of the file contains the weather data. If everything looks OK on this screen, you can hit the Next button to move onto the next step
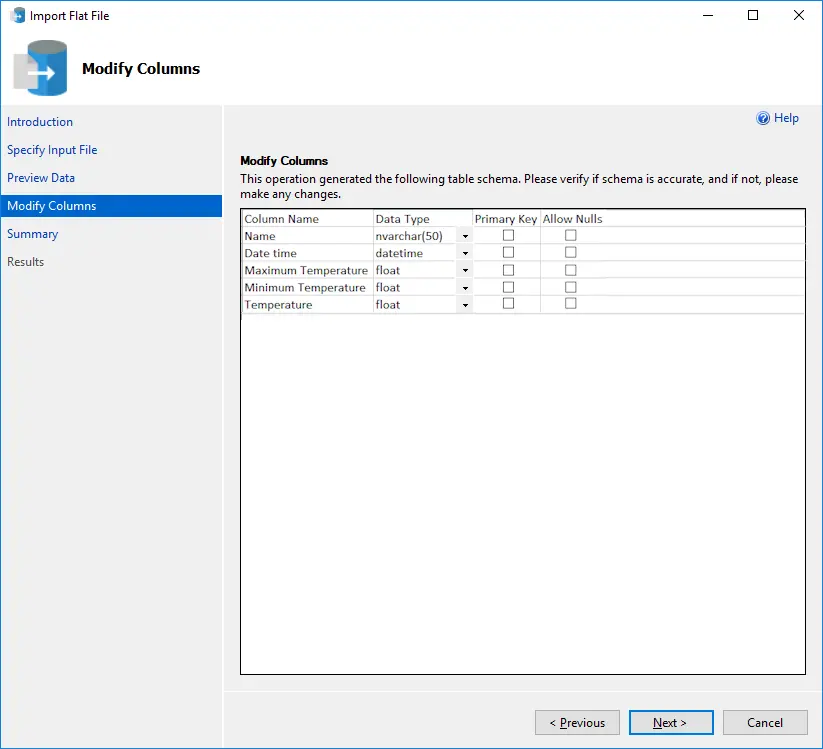
The final, interactive step is where you validate the column names and data types that the wizard has deduced for the data. You can simply approve the decisions that the tool has made for you or you can make adjustments to better fit how you would like the final data to appear in your SQL Server table. In general, you will want to select a Primary Key column and Allow Nulls for most weather data measures unless you have filtered them to not have null values. After you have made any desired adjustments, hit the Next button to continue.
The wizard will now show you a summary of the import process about that it is ready to perform. On this panel the Next button has become a Finish button indicating that the wizard is ready to do its work. When you press Finish, the weather data will be imported into your chosen table, and you will then see a results page showing you the status of the process. If you see the Result value shown as Success, then you know that your weather data has been imported, and your new data table is ready for use.
Using the SQL Server command line BCP tool
BCP, short for Bulk Copy Program, is an easy-to-use command line tool that ships along with SQL Server and is available on most installations. It allows you to construct simple command line tasks that can import data into and export out of SQL Server. For our purposes, we will use it to read a CSV weather data file and import it into an existing database.
Unlike the Management Studio wizard, BCP assumes that the data table already exists in the database. So, the first step is to manually create a table into which we want the tool to load the data. The table structure must exactly match the weather data that we are importing. If it does not, the import will fail. We will create this table using normal SQL and any of the SQL execution tools available. We could, for example, execute the SQL from within Management Studio, or we could execute it from the command line with a tool such as SQL Server’s own “sqlcmd” which is available for both Windows and Linux installations. Alternately, you can use your favorite 3rd-party SQL execution tool.
Based on the exact columns that you retrieved in your weather data CSV, you may need to modify the “create” SQL below to match. However, this example SQL should work well for default historical weather data and can be easily adjusted to meet other needs.
 CREATE TABLE WeatherData (
      [Name] varchar(256) DEFAULT NULL,
      [Date time] datetime DEFAULT NULL,
      [Maximum Temperature] float DEFAULT NULL,
      [Minimum Temperature] float DEFAULT NULL,
      [Temperature] float DEFAULT NULL,
      [Wind Chill] float DEFAULT NULL,
      [Heat Index] float DEFAULT NULL,
      [Precipitation] float DEFAULT NULL,
      [Snow] float DEFAULT NULL,
      [Snow Depth] float DEFAULT NULL,
      [Wind Speed] float DEFAULT NULL,
      [Wind Direction] float DEFAULT NULL,
      [Wind Gust] float DEFAULT NULL,
      [Visibility] float DEFAULT NULL,
      [Cloud Cover] float DEFAULT NULL,
      [Relative Humidity] float DEFAULT NULL,
      [Conditions] varchar(256) DEFAULT NULL);
Once we have created the table, we are ready to create and run a BCP command to import the actual data itself. The command line parameters for importing with BCP in order are table name, CSV file name, and then the required connection information for your database. That connection information is typically “-S <Server Name> -d <Database Name> -U <User Name> -P <Password>” Finally, at the end we put the command line flags that specify how we want the tool to process the input data. In our case we use “-c -t ,”. We use “-c” to indicate that the tool should read in character mode and “-t ,” to tell the tool that the field separator is a comma. (Don’t forget the comma (‘,’) character after the “-t”. It is easy to ignore it or think that it is a typo.)
So our sample BCP command looks like this.
bcp WeatherData in C:\temp\WeatherData.csv -S MySQLServer -d MyDatabase -U MyUser -P MyPassword -c -t ,
In this example, “WeatherData” is the table name, the input file is in “c:\temp\WeatherData.csv”, the SQL Server server is “MySQLServer”, the database name is “MyDatabase”, the user name is “MyUser”, and password for that use is “MyPassword”.
After executing this command, the weather data should be properly loaded into your table unless you get an error during the execution. To test this, simply use your favorite SQL tool again, and run a select from the “WeatherData” table. You should see your weather data returned.
Using SQL to import weather data
Yet another way to import weather data is by using SQL Server’s SQL directly. As in the BCP option, you first need to create the table to hold the data. If you need an example of the table create statement, just look up a few paragraphs, and you’ll see it in the previous section. Simply run the “create” SQL in your favorite SQL tool, and the table will be created for you. Remember that you need to match this SQL to the exact number and arrangement of columns in your input CSV. So, you may need to adjust the example SQL slightly to match the columns that you have.
After you have the table created, you can use SQL Server’s Bulk Insert command to load the weather data from the CSV file. You first provide the destination table name and then the “From” parameter that contains the CSV file that that you wish to import. The “With” parameters lists additional options to the command itself. In the example here, we tell SQL Server to start with row 2 (FIRSTROW = 2) thereby skipping the header row at the top of the file. We then tell it that the fields are comma separated (FIELDTERMINATOR = ‘,’) and that the line terminator is a normal newline character (ROWTERMINATOR = ‘\n’). Finally, we tell SQL Server that we want it to lock the table during the import process (TABLOCK). Our example SQL looks like this.
BULK INSERT WeatherData
 FROM 'c:\temp\WeatherData.csv'
 WITH
 (
     FIRSTROW = 2,
     FIELDTERMINATOR = ',',
     ROWTERMINATOR = '\n',
     TABLOCK
 )
(If you want to learn more about SQL Server’s “Bulk Insert” command parameters, see Microsoft’s documentation here: https://docs.microsoft.com/en-us/sql/t-sql/statements/bulk-insert-transact-sql?view=sql-server-ver15)
Other import options
The examples above highlight some of the most popular import methods, but there are still more options that we don’t have the space to cover in detail here. One additional import option that you can consider is to use the OpenRowset command. It is similar to the Bulk Insert option described above, and you can learn more about the exact syntax in the Microsoft OpenRowset documentation.
Another relatively complex yet powerful option is to use PowerShell to do the work. If you are already a PowerShell lover, this option may be ideal for you. The Microsoft documentation on the Import-Csv functionality will get you started. However, after reading the CSV in PowerShell, you will then need the final step of importing the results in SQL Server. There are several internet tutorials that can help you close this gap and get your data into a table.
One final and important way to import weather data into SQL Server or any database is via a custom code in Python, Perl, or even Java. While this can be seen as the most complex option it also allow complete flexibility throughout the entire process. Your code can automatically customize and execute weather queries using the API live against the weather server. It can then adjust, filter, or combine the result data however you wish before importing it into one or more SQL Server tables. An important benefit of using code is that you have the option to retrieve either CSV or JSON results from the weather server. JSON is typically just as easy to work with in code as CSV and has the important benefit that the code can handle changes and upgrades to the data structure without missing a beat.
If you would like to learn more about using code to make weather queries and read the results, we have various tutorials for Python using both CSV results and JSON. If you are more inclined to use Java, you can read a Java tutorial instead. You will then need to complete the process by writing the weather data into SQL Server. For that purpose. Microsoft supplies Python drivers and examples. Likewise, Microsoft also supplies a JDBC driver for SQL Server, and if you are a Java programmer with access to SQL Server you likely already have the driver installed. If you want examples to follow Microsoft provides some, and there are countless more on the internet.
Alternately, if you need to load weather data into a different database such as MySQL, Oracle, or others, please take a look at our various articles on the subject of database loading. Although the exact tools and steps vary depending upon the specific database platform, overall process is exactly the same. In most cases, there various options similar to the SQL Server options discussed above, that make weather data loading easy and accessible to everyone.
Summary
In this article we have shown you various ways to import weather data into your SQL Server database. These options range from simply using a SQL Server Server Management Studio wizard, to using SQL to do the import task. We even discussed options such as writing Python or Java code, and showed the tools and examples necessary to follow that path.
In summary, there are a plethora of ways to import weather data into SQL, and the best one for you depends on the tools that you have available and the technologies with which you feel most comfortable. Do you have a favorite SQL Server import option that we didn’t mention? Add it to the comments below. Do you need more specific help finding the right weather data, loading it into your database, and then using it for powerful analysis? Reach out to our weather data experts. They’ll be happy to help you get the weather data that you need.