

In this article, we are going to import weather data into a MySQL database. In addition to setting up the database tables, we will demonstrate techniques to import both historical weather data and weather forecast data. We will include the ways to retrieve the weather data and how to set up a script so the weather data can be refreshed on a schedule.
Weather data provider
We are going to use a Weather API that supports retrieving weather data as a web service. The data includes historical weather observations and weather forecast data and is available in a range of formats include CSV and JSON so the data is perfect for importing into MySQL. There is also a free API plan available.
If you don’t have an account, you can simply sign up for a free trial for Weather Data Services to obtain access. For help on getting started with the Weather Data Services page, see Getting Started With Weather Data Service.
Setting up the MySQL Database
Our first step is to create a MySQL database and create an empty table within the new database where the weather data will reside. In this example we are using MySQL version 8. We won’t be doing anything particularly complex however and so other versions should work as well.
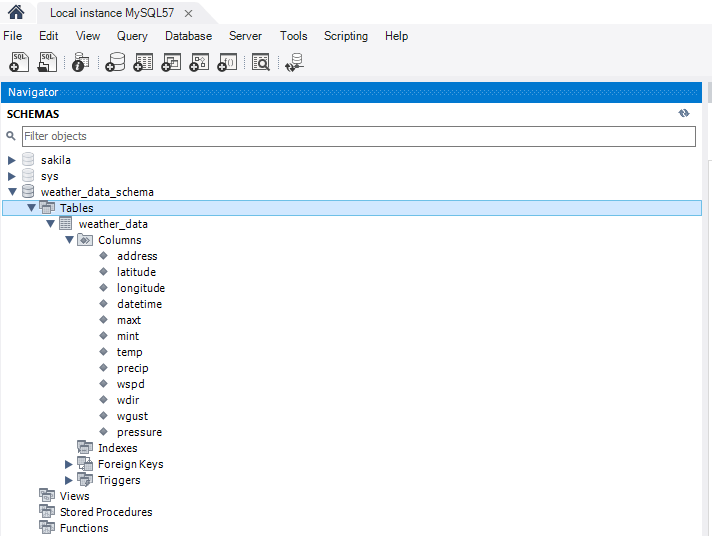
First we set up a new database schema for holding the weather data. We have named our new schema ‘weather_data_schema’. Within this schema we have created a single table called ‘weather_data’. Both weather history data and weather forecast data hold the same fundamental data, and so we can use the same table for both history and forecast results. In more advanced cases, different tables may be useful to include some of the data that specific to historical data or forecast data.
To create the table, we use the following script. To make things simple, we have named our columns with the same column name as the incoming weather data variable names.
CREATE TABLE `weather_data` (
  `address` varchar(256) DEFAULT NULL,
  `latitude` float DEFAULT NULL,
  `longitude` float DEFAULT NULL,
  `datetime` datetime DEFAULT NULL,
  `maxt` float DEFAULT NULL,
  `mint` float DEFAULT NULL,
  `temp` float DEFAULT NULL,
  `precip` float DEFAULT NULL,
  `wspd` float DEFAULT NULL,
  `wdir` float DEFAULT NULL,
  `wgust` float DEFAULT NULL,
  `pressure` float DEFAULT NULL
) ENGINE=InnoDB DEFAULT CHARSET=utf8mb4 COLLATE=utf8mb4_0900_ai_ci;
We now have a database with an empty weather data table. We are reading to load some weather data!
Loading the weather data into MySQL using Python
As we mentioned above, we are going to use a weather web service called the Visual Crossing Weather API to retrieve the weather data we are interested in. In our first example, we are going to create a Python script that we can run at regular intervals to retrieve the weather forecast data.
Prerequisites
Our Python script was written in Python 3.8.2. In addition to the core Python, we installed the MySQL Connector for Python. Finally, we had some errors about missing libraries for dns so we had to install DNSPython. This last dependency may not be required when you create script.
Here’s the full list of import statements in our script
import urllib.request
import json
import mysql.connector
from datetime import date, datetime, timedelta
Script part one – setting up the input parameters
Our Python script is split into two parts. The first part downloads the weather data and the second part inserts the weather data into the MySQL database table. The weather data is retrieved using a RESTful weather api. This means that we simply have to create a web query within the Python script and download the data.
The first part of the sets up some variables to customize the weather data that is entered. In your script you may want to extract these as parameters to the script.
# This is the core of our weather query URL
BaseURL = 'https://weather.visualcrossing.com/VisualCrossingWebServices/rest/services/weatherdata/'

ApiKey='INSERT_YOUR_KEY_HERE'
#UnitGroup sets the units of the output - us or metric
UnitGroup='us'

#Locations for the weather data. Multiple locations separated by pipe (|)
Locations='Washington,DC'

#FORECAST or HISTORY
QueryType='FORECAST'

#1=hourly, 24=daily
AggregateHours='24'

#Params for history only
StartDate = ''
EndDate=''
As the code demonstrates, you should enter your API key to set the value of the variable ‘ApiKey’. You can also switch the query between forecast and history weather data. The Locations parameter is a pipe (|) separated list of location addresses, partial address or longitude,latitude values for the weather data retrieval. For more information on the full set of Weather API parameters, see the Weather API documentation.
Script part two – downloading the weather data
The next section of code creates the Weather API request from the parameters, submits the request to the server and then parses the result.
# Set up the specific parameters based on the type of query
if QueryType == 'FORECAST':
    print(' - Fetching forecast data')
    QueryParams = 'forecast?aggregateHours=' + AggregateHours + '&unitGroup=' + UnitGroup + '&shortColumnNames=true'
else:
    print(' - Fetching history for date: ', DateParam)

    # History requests require a date.  We use the same date for start and end since we only want to query a single date in this example
    QueryParams = 'history?aggregateHours=' + AggregateHours + '&unitGroup=' + UnitGroup +'&startDateTime=' + StartDate + 'T00%3A00%3A00&endDateTime=' + EndDate + 'T00%3A00%3A00'

Locations='&locations='+Locations

ApiKey='&key='+ApiKey

# Build the entire query
URL = BaseURL + QueryParams + Locations + ApiKey+"&contentType=json"

print(' - Running query URL: ', URL)
print()


response = urllib.request.urlopen(URL)
data = response.read()
weatherData = json.loads(data.decode('utf-8'))
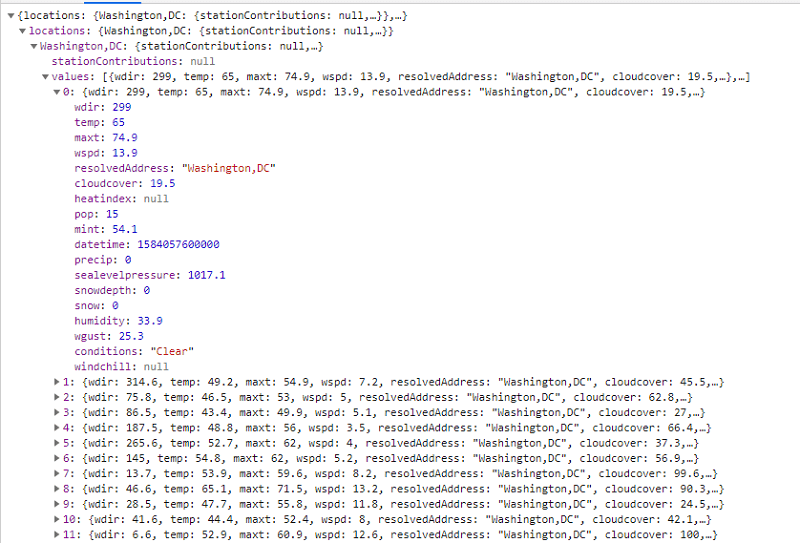
In this case, we are using the JSON result to retrieve the weather data for easy parsing when we insert the data into MySQL. The output JSON is formatted as follows. The top-level includes locations and columns information. Each location’s weather data is found as a individual location instance. Below each location is an array of values. These values correspond to the individual time periods in the requested data so will be hourly or daily in our example. For full information about the returned weather data, see the weather data documentation.
Script part three – insert the weather data into our MySQL table
Our next part of the script actually inserts the weather data into the database table. Here’s the code to set up the connection and sets up the SQL statements. Note that in this example we simply empty any existing data within the weather data table. There’s no reason to do that if you would prefer to build up a record of the weather data.
print( "Connecting to mysql database")
#connect to the database. Enter your host, username and password
cnx = mysql.connector.connect(host='127.0.0.1',
    user='YOUR_USERNAME',
    passwd='YOUR_PASSWORD',
    database='weather_data_schema')

cursor = cnx.cursor()

# In this simple example, clear out the existing data in the table

delete_weather_data=("TRUNCATE TABLE `weather_data_schema`.`weather_data`")
cursor.execute(delete_weather_data)
cnx.commit()
The next part of the script then iterates through the locations and then the weather data values within the locations. The code creates statement to perform the insert. Then during the value loop it creates a parameters from the weather data.
# Create an insert statement for inserting rows of data
insert_weather_data = ("INSERT INTO `weather_data_schema`.`weather_data`"
                "(`address`,`latitude`,`longitude`,`datetime`,`maxt`,`mint`,`temp`,`precip`,`wspd`,`wdir`,`wgust`,`pressure`)"
                "VALUES (%(address)s, %(latitude)s, %(longitude)s, %(datetime)s, %(maxt)s,%(mint)s, %(temp)s, %(precip)s, %(wspd)s, %(wdir)s, %(wgust)s, %(pressure)s)")

# Iterate through the locations
locations=weatherData["locations"]
for locationid in locations:
    location=locations[locationid]
    # Iterate through the values (values are the time periods in the weather data)
    for value in location["values"]:
        data_wx = {
        'address': location["address"],
        'latitude': location["latitude"],
        'longitude': location["longitude"],
        'datetime': datetime.utcfromtimestamp(value["datetime"]/1000.),
        'maxt':  value["maxt"] if 'maxt' in value else 0,
        'mint': value["mint"] if 'mint' in value else 0,
        'temp': value["temp"],
        'precip': value["precip"],
        'wspd': value["wspd"],
        'wdir': value["wdir"],
        'wgust': value["wgust"],
        'pressure': value["sealevelpressure"]
        }
        cursor.execute(insert_weather_data, data_wx)
        cnx.commit()

cursor.close()
cnx.close()
print( "Database connection closed")

print( "Done")
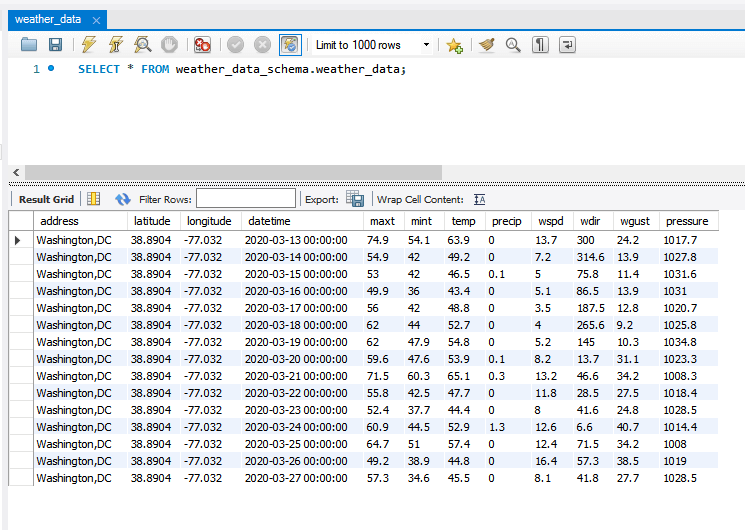
After the script executes, we can see the data if we fresh the data inside MySQL.
Next steps
If you would like the full code, you can find it in our Github repository. In this article, we’ve seen how easy it is to insert weather data into a database such as MySQL. Do you have questions? Please ask below!