

As Ruby is a key language used to build web applications and an important language for data analysis, it is natural that Ruby developers would want to load weather data into their applications. Luckily, Ruby’s built-in functions make it easy to compose and execute web queries and also easy parse the JSON results into objects that can be used directly within the Ruby application. In this article we’ll show you how to load and use weather data within your own Ruby applications.
This guide assumes that you already have a Visual Crossing Weather account. If you don’t already have one, however, it is free and easy to sign up. Simply provide your email address, obtain your API key, and you will be ready to follow the steps below to load weather data into Ruby.
Building a weather query URL
The first step in loading weather data into your Ruby code is to create a weather query. You can do this in various ways including by using our web-based query page. Simply define your query in the interface, and the page will generate the query URL to match. Alternately, a query can be constructed either manually or in code by using the Weather API documentation as a guide.
One of the easiest weather queries and the one that we will use in the remainder of this guide is a simple Timeline Weather query for the 15-day forecast. In the URL for this query, we only need to specify the location, and the weather engine will infer that we wish to query the forecast. That query URL looks like this:
https://weather.visualcrossing.com/VisualCrossingWebServices/rest/services/timeline/<LOCATION>?key=<YOUR_API_KEY>
Simply replace the <LOCATION> placeholder with your desired query location, for example, Paris, France and the <YOUR_API_KEY> with the API Key for your account. If my API Key is 1234567890, I could use the follow query to obtain the 15-day forecast for Paris.
https://weather.visualcrossing.com/VisualCrossingWebServices/rest/services/timeline/Paris?key=1234567890
Of course, this query is the most basic weather query example, and I could specify any location on any date, past, present, or future. You can learn more about the Timeline Weather API and the available options and parameters in our documentation. It is good to get familiar with the API options because you will often want to build query URLs in the Ruby code instead of running fixed URLs. Using the documentation, you can assemble the URL parameters easily to create all types of custom and dynamic queries.
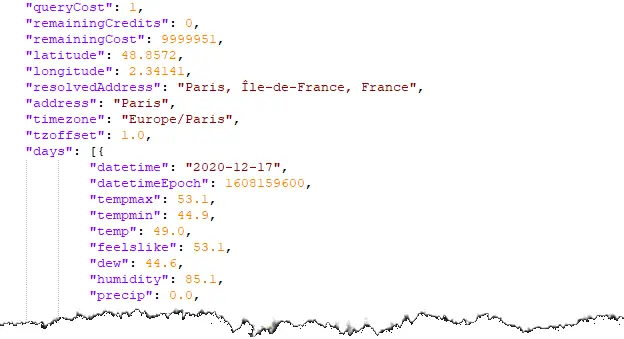
One key benefit to a URL API is that you can test the query URL in any browser and instantly see the JSON result. The Paris query above should produce a result that looks like this.
Executing a query URL in Ruby
Once you have a weather query URL either created manually, via the weather query page, or constructed in your Ruby code, you are ready to run the query. Ruby has the URI module that allows code to easily manipulate URLs. In this example, we will use the entire query URL as a static string. However, more sophisticated code would use URI functions to actually construct the the URL from pieces and parameters.
We can then use Net::HTTP to send the query URL to the weather server and retrieve the response data. Ruby will automatically handle the network communications between our client and the weather server and return the HTTP response. From that response we can retrieve the response body, and that body will contain our weather data.
Here is an example code snippet.
require 'uri'
require 'net/http'
require 'openssl'

url = URI(" https://weather.visualcrossing.com/VisualCrossingWebServices/rest/services/timeline/Paris?key=<YOUR_API_KEY>")

http = Net::HTTP.new(url.host, url.port)
http.use_ssl = true
http.verify_mode = OpenSSL::SSL::VERIFY_NONE

request = Net::HTTP::Get.new(url)

response = http.request(request)
body = response.read_body
(Note that since Net::HTTP is handling all of the network communication for us, we need to instruct it on how to deal with the SSL negotiations inherent in an HTTPS exchange. In this example, we dodge the certificate validation by using OpenSSL::SSL::VERIFY_NONE. This helps simplify the example and ensure that everyone can run it successfully. However, in production code, you would want to use OpenSSL::SSL::VERIFY_PEER and manage the certificates appropriately.)
Parsing JSON weather results in Ruby
Now that we have the weather data available to us in the query response body, our final step before we can use the data is to parse it as JSON. There are several ways to do this in Ruby, and one of the easiest ones is the use the JSON module. To show how to do that, we’ll pick up the sample code above from where we left off. A single call to JSON.parse() takes the query response body and turns it into a hash. Our code can then read weather values from the hash for use elsewhere in our code. For example, we could take the condition description, temperatures, and rainfall chance to produce a simple weather display. Alternately, our code could iterate through all of the available measures and feed the dataset to a custom data analysis engine. With Ruby, the possibilities are endless. However, in this simple example code, we’ll settle for printing a few key measures for each day in the forecast.
require "json"

body = response.read_body  # From the URL query code above
weather = JSON.parse(body)

weather["days"].each do |days|
   weather_date = days["datetime"]
   weather_desc = days["description"]
   weather_tmax = days["tempmax"]
   weather_tmin = days["tempmin"]

   puts "Forecast for date: #{weather_date}"
   puts " General conditions: #{weather_desc}"
   puts " The high temperature will be #{weather_tmax}"
   puts " The low temperature will be #{weather_tmin}"
 end
Summary
In this article you have seen how easy it is to create a weather query using Visual Crossing Weather, run that query in Ruby, and then parse the JSON results. Armed with these parsed results, you are ready to begin using the data for your own weather use case. Since Ruby is ideally suited for web apps and data analysis, your next step might be to feed weather data into a web display or a business analysis.
Of course, the forecast example in this article shows just the most basic example of how you can use the Visual Crossing Weather API in Ruby. But even from this simple query, you can read many different forecast weather measures as well as current conditions. The Timeline Weather API also supports historical queries that can return weather reports from any global location for any time and date since 1970. Beyond that, our statistic (climate-based) forecasts allow you to see weather norms for any date of the entire year. When coding in Ruby, you will be able to put this functionality and much more to work in your application.
Questions or need help?
If you have a question or need help, please post on our actively monitored forum for the fastest replies. You can also contact our Support Team.