

Learn how the Weather Workbook is constructed and how you can modify it to make your own custom interface.
Background
Many of you may already be familiar with the Visual Crossing Weather Workbook for Excel. If you are note and want to learn more we encourage you to first download the workbook and pull data into your own workbook. Please review the Weather Workbook Blog as a starting point.
As you know, Weather Workbook is a standard Excel Workbook that utilizes the built-in Power Query capability to call the Visual Crossing Weather Data Service and retrieve weather data in the form of either a forecast or historical data request. End users can simply change locations, dates and some additional parameters in the Excel workbook and get weather data immediately into their workbook. No need to login to web pages, write code nor be familiar with anything other than Excel.
In this technote, we will give you the details of how the query is made and show you how you can modify the Weather Workbook to make your own custom workbook that retrieves weather data. The following are the prerequisites assumed of the reader:
- Basic Excel Skills including using cells in formulas.
- Basic understanding of how URLs are constructed to make calls to a web server
- You have signed up for a Visual Crossing Weather Data Service account that has an API Key access.
- You have read the above document on Weather Workbook and successfully made a query using the standard interface.
We will teach you two basic techniques in Weather Workbook. 1) How the query is constructed and the URL call is made 2) How to modify and move around your own input fields to make your own interface. If you only want to understand point 2, we recommend understanding the section on ‘Entry Fields’ first and then you can skip to the section on ‘Modifying the Weather Workbook’.
For those that want to know all of the details, lets get started…
Basic Structure of the Workbook
There are three basic items we need to build a weather query and call the Visual Crossing RESTful API via a URL.
- Entry Fields – These are cells where the user will enter data to send in the query such as Locations, Dates and Parameters of their weather queries.
- URL Strings – There are two URL strings, one for History and one for Forecast. These strings basically combine the base URL string with the parameters to make the final URL that is sent to the server.
- Power Query – There are two queries in the worksheet that ultimately retrieve the data for us. These queries are tied to a result location in the form of result data on separate sheets. (HISTORY and FORECAST)
We will go into the details for each of these, please have your Weather Workbook open while we walk through these steps.
Entry Fields
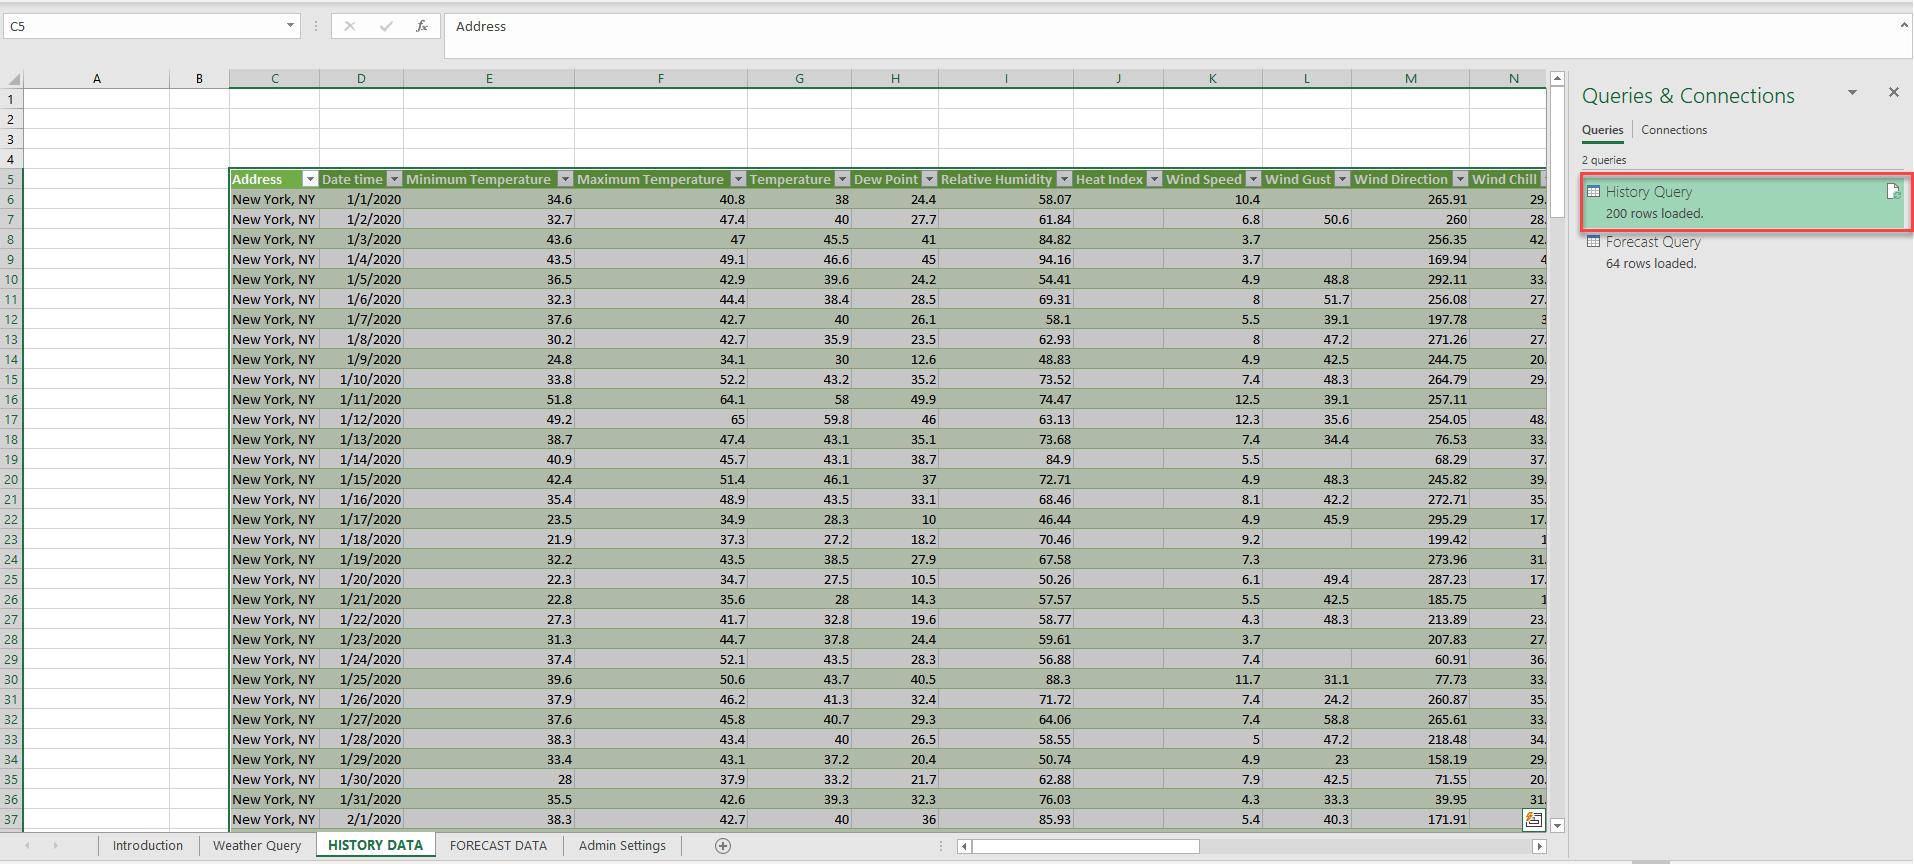
The user entry fields are found in the “Weather Query” sheet as seen below:
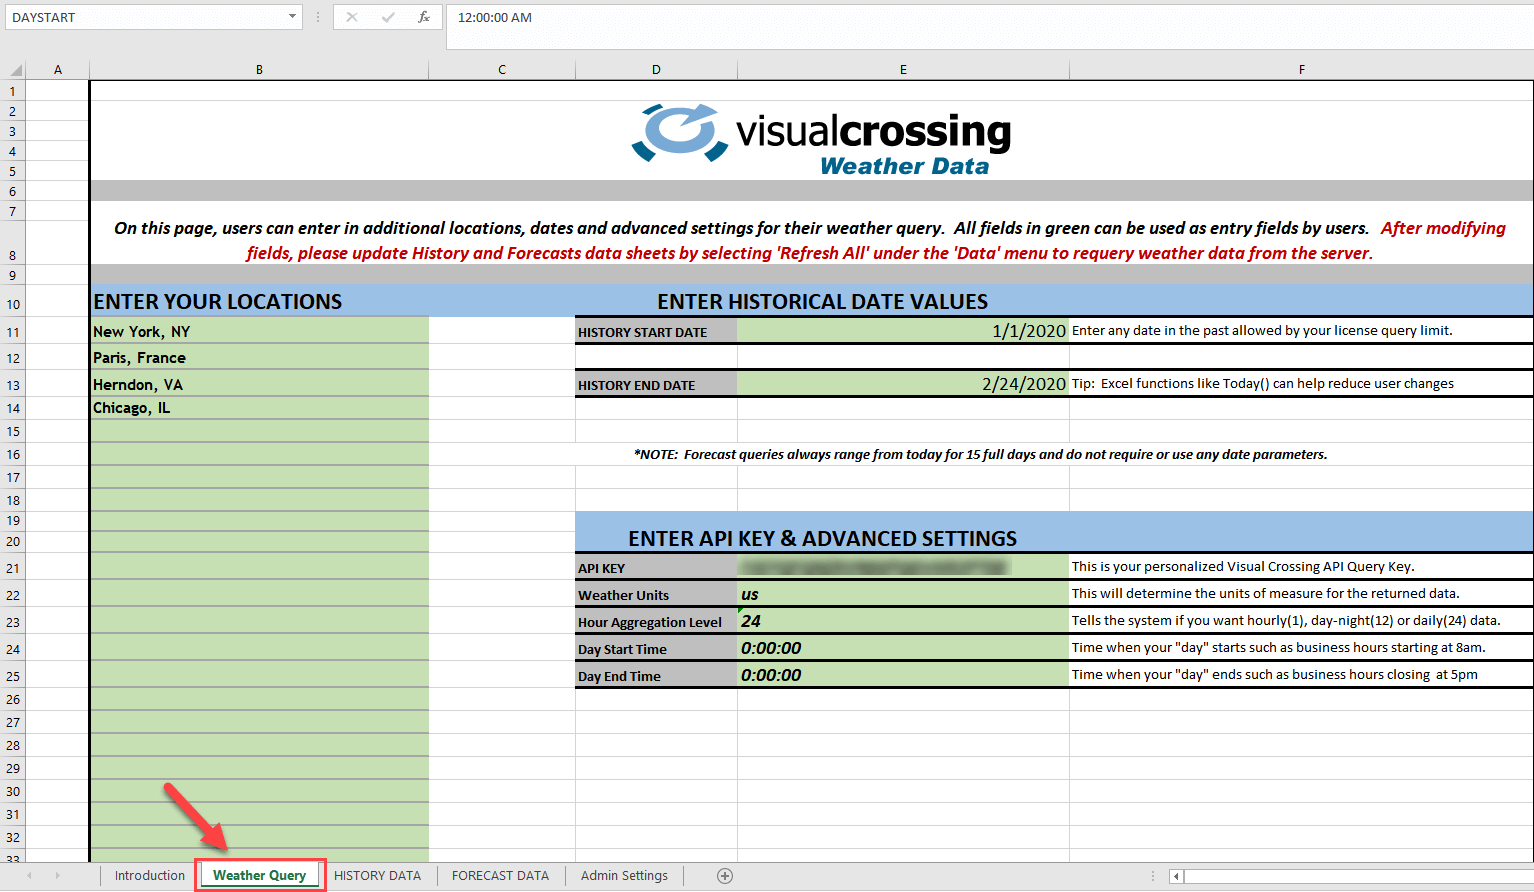
All of the Entry Fields have been background colored in green. As a matter of best practices, these areas have also been given a defined name in Excel. To understand this better select all of the green cells under the “ENTER YOUR LOCATIONS” header text. (do not include the header text but get all 30 green cells). Once selected you should see the following:
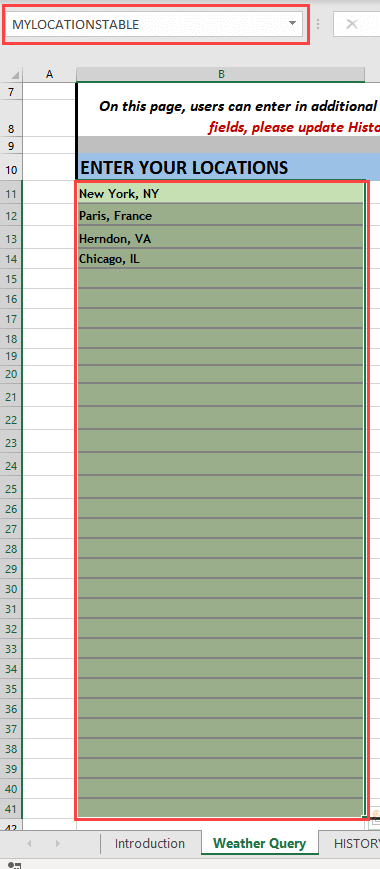
Once we have selected all 30 green input cells we can see in the popdown at the top that this range of cells has a defined name called “MYLOCATIONSTABLE”. Later we will show you how you can create your own input cells and define its name. For now, just understand that this range of cells can be reference by that name. Here is a list of all user input fields and their corresponding names:
End-User Entry Field URL Components
- “ENTER YOUR LOCATIONS” = MYLOCATIONSTABLE
- “HISTORY START DATE” = FMTSTARTDATE
- “HISTORY END DATE” = FMTENDDATE
- “API KEY” = VCKEY
- “Weather Units” = UOM
- “Hour Aggregation Levels” = AGGHOURS
- “Day Start Time” = DAYSTART
- “Day End Time” = DAYEND
These defined names are used directly in the URL construction function so make certain that these names are carefully maintained. Other than the Input Fields on this page, there are other defined names that are used by the query and are not user editable but you as the designer, may find yourself wanting to edit them for more custom work. They reside on the Admin Settings sheet seen below:
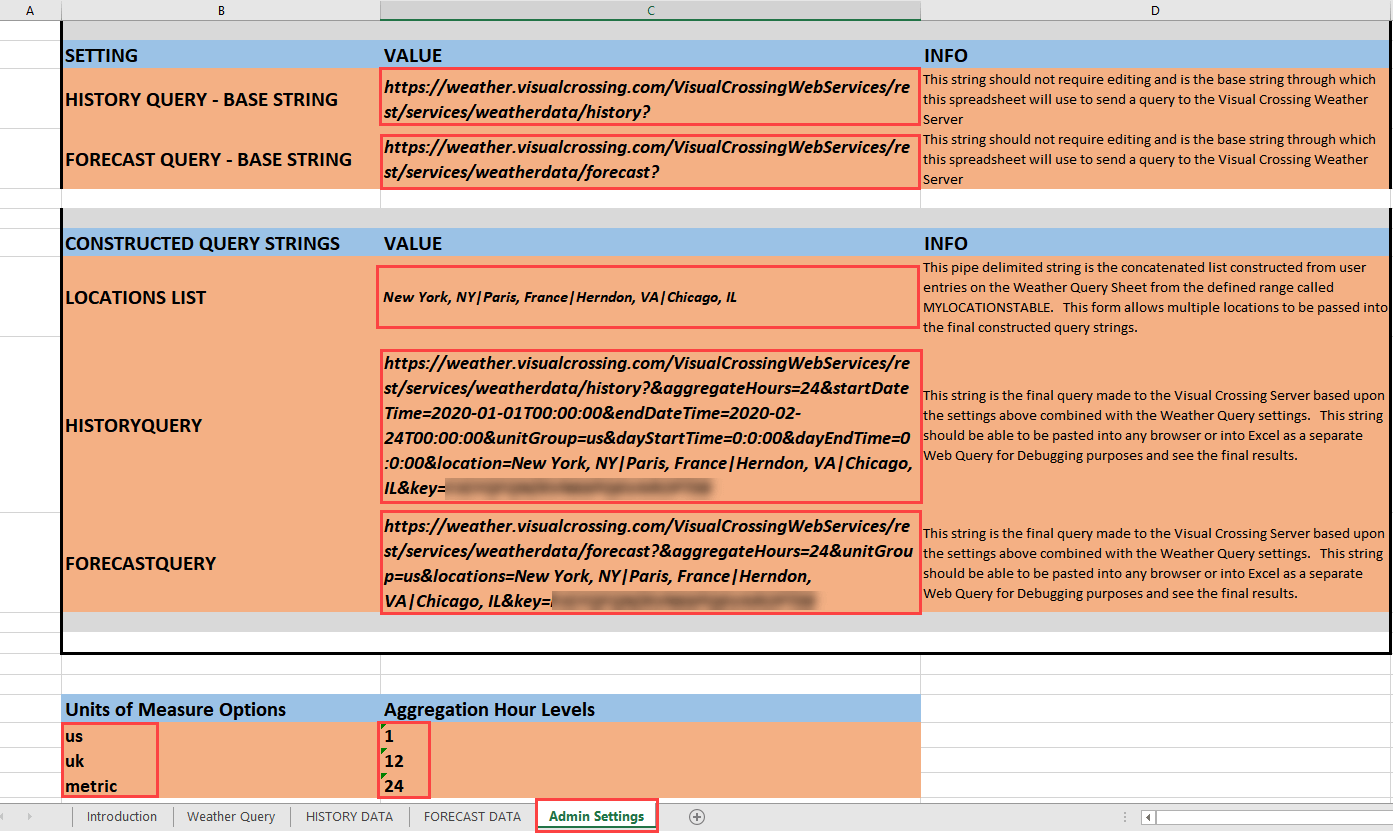
These named cells are broken into 3 parts: URL Components, Entry Field Options and Final URL Strings:
Base URL Components – Hard-coded strings to build the initial part of the URL
- “HISTORY QUERY – BASE STRING” = HISTORYBASE
- “FORECAST QUERY – BASE STRING” = FORECASTBASE
- “LOCATIONS LIST” = WxLOCATIONS
Entry Field Options – used as a content list to other entry fields on Weather Query sheet
- “Units of Measure Options”= UOMLIST
- “Aggregation Hour Levels” = AGGLIST
Final URL Strings – Final URL query that includes all fields and parameters
- “HISTORYQUERY” = HISTORYQUERY
- “FORECASTQUERY” = FORECASTQUERY
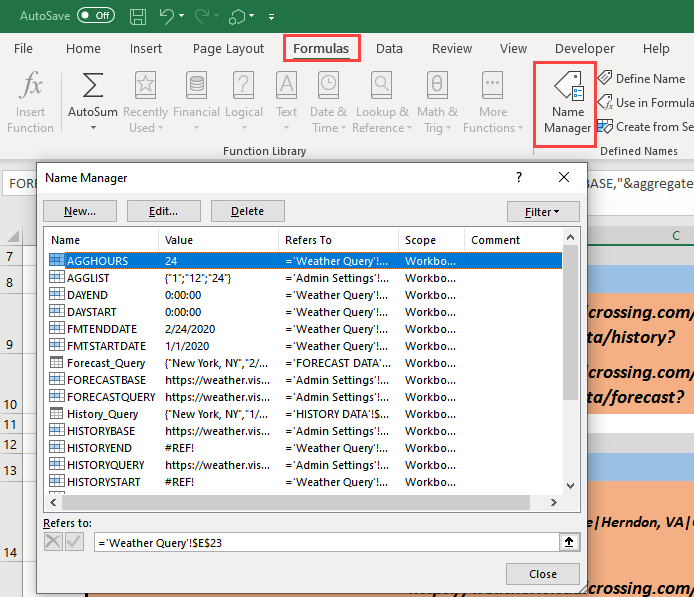
If at any point you want to see the entire list of defined names for the entire workbook by navigating to the ‘Formulas’ menu in Excel and choosing ‘Name Manager’ as seen below:
Now we we know all of our input fields we have what we need to construct the URL String.
URL Strings
The URL Strings for both History and Forecast are constructed as follows: Base String + User Values & Parameters. It sounds simple but as we saw above there are quite a few entry fields, settings and more to consider.
NOTE: It is possible to construct a single query string for both history and forecast by creating an entry field that asks the user for “history” or “forecast” as a query type. We chose not to do this in Weather Workbook as we have many users who need both sets of data at the same time.
Also note that the parameters we are sending across are part of the Weather API and are defined here:
We will start by looking at the formula for the HISTORYQUERY url:

By clicking on the value field we can see the formula for how that URL is constructed from our Named Fields we discussed earlier:
=CONCAT(HISTORYBASE,”&aggregateHours=”,AGGHOURS,”&startDateTime=”,TEXT(FMTSTARTDATE,”yyyy-mm-ddThh:mm:ss”),”&endDateTime=”,TEXT(FMTENDDATE,”yyyy-mm-ddThh:mm:ss”),”&unitGroup=”,UOM,”&dayStartTime=”,TEXT(DAYSTART,”h:m:ss”),”&dayEndTime=”,TEXT(DAYEND,”h:m:ss”), “&location=”,WxLOCATIONS,”&key=”,VCKEY)
The first things to note is that we use the ‘CONCAT’ function in Excel to build a final string from its component pieces. Every parameter to this function is another string and you keep repeating until done. Let’s take a look at how Web URL queries are constructed. They have the following format:
<Base URL>?<ParameterName>=<ParameterValue>&<ParameterName>=<ParameterValue>&…
We will follow this format using the our ‘CONCAT’ Excel function. We will start with the base string + parameter + value. This looks like the following:
CONCAT(<URL Base String>, “&<parameter>=”, value…
Notice how the parameter is preceded by ‘&’ and followed by ‘=’ sign. This gives us the format that the web server expects of our URL. Most of the parameter values are just strings but there are 3 places we want you to pay special attention to:
- History Start/End DateTime – These fields require that the dates are formatted as the Visual Crossing API expects. Here we format these strings on-the-fly by using the Excel ‘TEXT’ function:
- TEXT(FMTSTARTDATE,”yyyy-mm-ddThh:mm:ss”)
- we simply pass in the field value and the supported date/time format string
- Day Start/End Time – We take the same approach with these fields except the format is for time
- TEXT(DAYSTART,”h:m:ss”)
- Locations – The locations parameter can take one or more locations, however it must also be in a format that uses a pipe-delimited “|” list. Pipe is used as it differentiates from commas and other characters that might commonly be used in addresses. To put the list of locations into a string list we use the Excel ‘TEXTJOIN’ function but instead of doing this inline we use the “LOCATIONS LIST” field as a buffer to construct this string:
- =TEXTJOIN(“|”, TRUE, MYLOCATIONSTABLE)
- we construct a new string by having this function grab every cell value and delimit the values with “|”
We now have our values into a single string and ready to send to the Visual Crossing server to get weather. Now onto the final component and that is the query itself.
Power Query
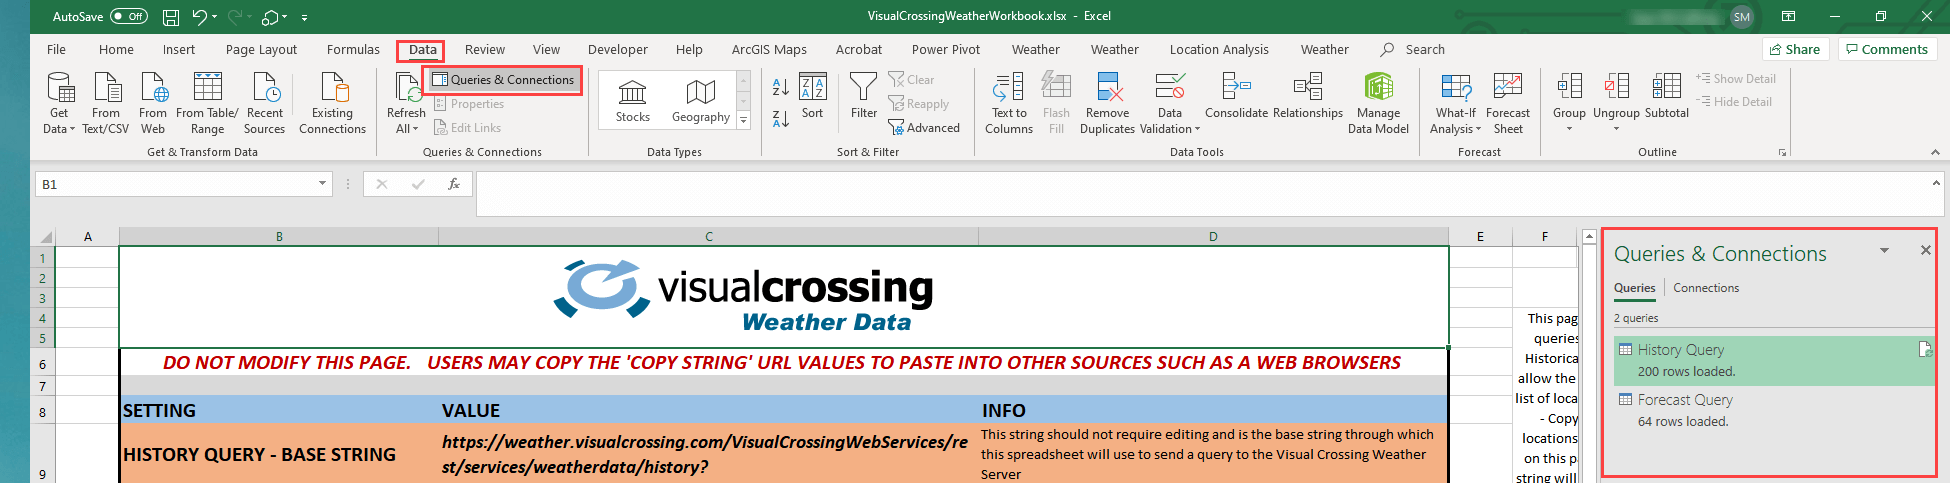
As previously mentioned, Excel has a built-in query capability called Power Query. Power Query not only sends the query across but manages the data that is returned and structures it into a metadata of sorts. It determines your columns, types and data. On first run, it allows you also to customize how the results are interpreted into columns/data. Every refresh will follow those rules that you determine. The original construction of the queries was done by clicking on the “From Web” button on the ‘Data’ menu in Excel. Simply entering in a pre-constructed URL such as the final “HISTORYQUERY” string will empower the Power Query system to set up the first query. Let’s take a look at our queries and the modifications we made to make them parameter driven. Under the ‘Data’ menu click on “Queries & Connections”:
A left dock panel will open with our two queries for History and Forecast. Right-click and choose to edit History and then choose “Advanced Editor” from the ribbon bar.
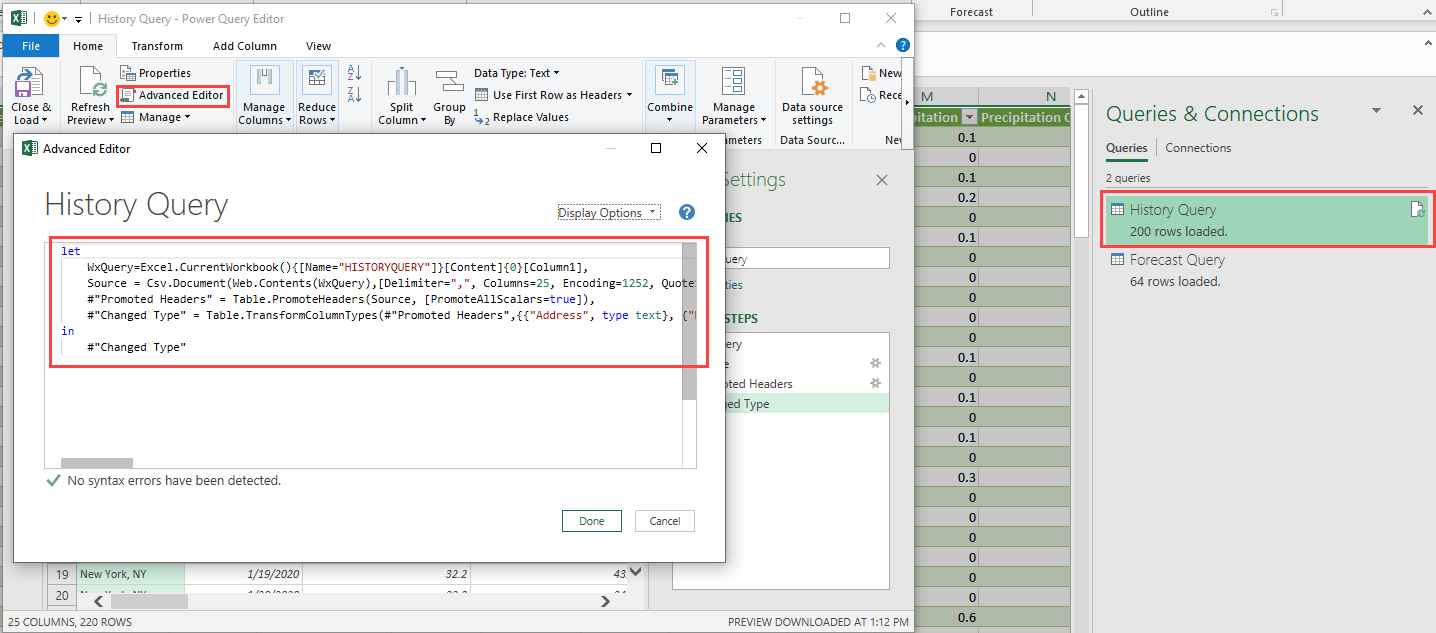
You should now have open query code for one of our queries. Only the first two lines of code are important here. The first line defines a variable string called “WxQuery” that fetches our final URL Query String (History in this case) from our current workbook:
WxQuery=Excel.CurrentWorkbook(){[Name=”HISTORYQUERY”]}[Content]{0}[Column1],
Notice how it references the exact Defined Name that we discussed earlier. It is asking for all content in this named range of Row 0 and Column 1. Now we have the URL String to query on. The second row of the query code sets the ‘Source’ of the query using our string:
Source = Csv.Document(Web.Contents(WxQuery),[Delimiter=”,”, Columns=25, Encoding=1252, QuoteStyle=QuoteStyle.None]),
Note that it is asking for a CSV style of data that Visual Crossing offers to make integration with Excel easy. The Web.Contents value for the CSV query contains our newly constructed URL. Now our Power Query dynamically uses our URL String which is dynamically constructed from end users cell entries.
Please note that Queries can be set up to refresh in many different ways, including on opening of the workbook or users can set up buttons which use a VB Macro to do the refresh action. Some of which are discussed here:
How to automatically refresh Weather Data in Microsoft Excel
Modifying the Weather Workbook
In this section we will cover the most commonly requested customization of the Weather Workbook which is the ability to construct a unified data and entry page. We will take a few common entry fields and co-locate them with the data results. Let start by moving the Locations entry to the HISTORY DATA. We will start by inserting two columns and 4 additional blank rows.
Notice how the selected query manages the data result area. We have simply moved the section over but the connection to the query still remains. Next we will Cut and Paste our Locations field to column A. Be sure to select all green cells and before you cut the range of cells that its name, “MYLOCATIONSTABLE” is visible in the popdown. This ensures that you have the entire entry field and that the name will go with your paste operation.
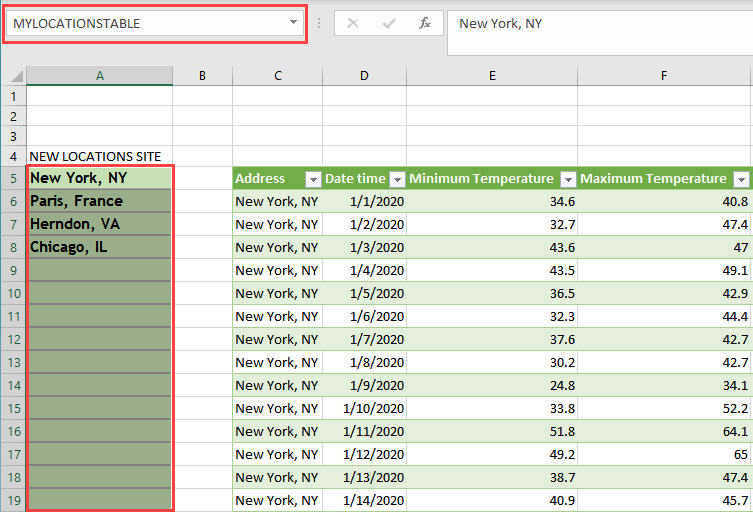
By using Cut and Paste instead of Copy it will move then entire section as well as the Defined Name which is critical to the operation of the query. Please notice above that the name is maintained in the new location so no changes to the URL concatenated string nor the query is required. We simply moved the location entry cells. If for some reason you want to redefine the range of cells you can delete the name “MYLOCATIONSTABLE” from the Names Manager that we showed you earlier and then select a new range of cells and right click to choose “Define Name” and if you name the range “MYLOCATIONSTABLE” then no other changes are required.
You can change the defined name of any entry cell but the key is to make sure that throughout any name changes that you make, that your data entry fields have a defined name that is referenced in the Query String that we build.
Now let’s copy over the History Start and End Date fields.
We now have a new UI that integrates locations chooser, date chooser and the result data. Let’s test it with a new set of locations and dates and then Refresh the query: (right click on the data and select “Refresh”)
Success! One final note is to encourage you to make changes as the worksheet was designed to be a starting point for customers. Be sure to always keep a backup of your original workbook and stages of work so that you can revert back if you make mistakes. The Weather Workbook is fully editable and built for your use in whatever way Visual Crossing Weather customers need. Please reach out to us at our Support Team if we can help guide you with your weather project.