

In this article, we are going to build a simple Microsoft Outlook add-in that shows weather data in an ‘task panel’. Where possible, it will extract location information from the currently open email. It will show the weather history when the email was sent and the weather forecast for the same location. We will be using the Visual Crossing Weather API to provide the weather data.
Whenever a message is loaded, we attempt to read the location either from the email itself or from the contacts associated with the email. The date is the sent date. The user can then change the location (or add one if Outlook couldn’t detect it) and the weather data will be refreshed.
In this example, we will be creating a JavaScript-based Microsoft Office Add-in for Outlook.
To download the source code for this sample and many other JavaScript, Java and other languages, see our repository at https://github.com/visualcrossing/WeatherApi/
Step one – sign up for the Weather API to get your free API key
Before we write our script, let’s take a look at a sample Timeline Weather API call to retrieve the weather forecast for ‘New York City,NY’ in the USA. The call is very simple – include the encoded location in the path and then add your API key to the key parameter.
https://weather.visualcrossing.com/VisualCrossingWebServices/rest/services/timeline/New%20York%20City%2CNY?unitGroup=us&key=YOUR_API_KEY
In the above query, we ask for the weather forecast for New York City. For our add-in, we also want to retrieve historical weather data. We can request weather data for particular a date or date range:
https://weather.visualcrossing.com/VisualCrossingWebServices/rest/services/timeline/New%20York%20City%2CNY/2020-1-1?unitGroup=us&key=YOUR_API_KEY
In this case, we will retrieve weather data for January 1st 2020. The API will automatically determine if you requested historical weather data, weather forecast data or even statistical forecast data when you request for a data in the future beyond the current forecast.
If you don’t have an API key yet, head over to Visual Crossing Weather Data Services to sign up for you free account – you will be able to make up to 1000 requests for free every day. You can also create Timeline API requests interactively directly within the tool and explore the JSON output.
Step two – create a skeleton Outlook add-in project
We will create a simple skeleton Outlook Add-in using the example described here. Before proceeding to the next step, ensure that you can successfully run the example add-in as the following changes will rely on a working Outlook Add-in.
If you download the source from our Github, you will still need to have core Node.js components set up so you can launch the add-in from your local computer.
Step three – create a basic HTML template
There are four main files we will change to create our add-in:
manifest.xml – the add-in manifest file which describes the properties of the add-in and allows it to be installed.
taskpane.html – the single html file of the addin which provides the basic user interface.
taskpane.css – the CSS styling information for the add-in HTML.
taskpane.js – the JavaScript source file which reads the add-in properties, loads the Weather Data from the Weather API and renders the appropriate HTML.
manifest.xml changes
Most of the changes we make to the manifest file are superficial. For example we add our own name and add-in description. One change we make is to allow the task pane to be pinned (otherwise the task pane closes when you change from one email to another). This change is a simple property change of adding the ‘SupportsPinning’ element. However it also required an additional ‘VersionOverrides’ section in the manifest. See the full source code for details.
<action xsi:type="ShowTaskpane">
  <sourcelocation resid="Taskpane.Url">
  <supportspinning>true</supportspinning>
</sourcelocation></action>
taskpane.html and taskpane.css changes
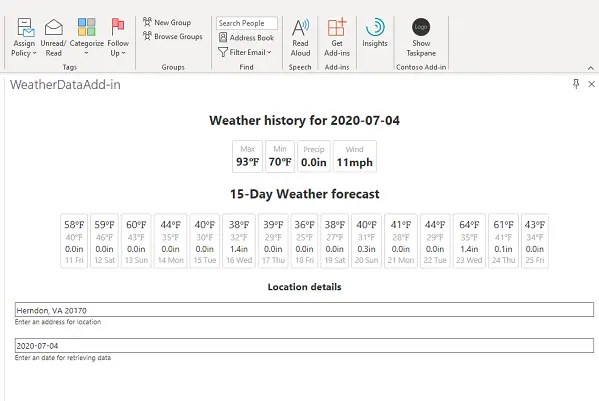
The contents of the original taskpane.html file is changed to include elements for displaying the location, date and weather data. We’ll keep things very simple so we’ll simply show a text box for the address and date and then show a table of the weather.
<!DOCTYPE html>
<html>

<head>
    <meta charset="UTF-8" />
    <meta http-equiv="X-UA-Compatible" content="IE=Edge" />
    <meta name="viewport" content="width=device-width, initial-scale=1">
    <title>Visual Crossing Weather Task Pane Add-in</title>

    <!-- Office JavaScript API -->
    <script type="text/javascript" src="https://appsforoffice.microsoft.com/lib/1.1/hosted/office.js"></script>


    <script src="https://code.jquery.com/jquery-3.4.1.min.js"></script>

    <!-- For more information on Office UI Fabric, visit https://developer.microsoft.com/fabric. -->
    <link rel="stylesheet" href="https://static2.sharepointonline.com/files/fabric/office-ui-fabric-core/9.6.1/css/fabric.min.css"/>

    <!-- Template styles -->
    <link href="taskpane.css" rel="stylesheet" type="text/css" />
</head>

<body class="ms-font-m  ms-Fabric">
    <header class="">
        <h1 class="">Visual Crossing Weather</h1>
    </header>
    <section id="sideload-msg" class="">
        <h2 class="">Please sideload your add-in to see app body.</h2>
    </section>
    <main id="app-body" class="vc-flex-vertical" style="display: none;">
        <input type="text" class="vc-address-input" placeholder="Enter address" />
        <div class="vc-small">Enter an address for location</div>
        <input type="text" class="vc-date-input vc-margin-top" placeholder="Enter date" />
        <div class="vc-small">Enter an date for retrieving data</div>
        <h3 class="vc-history-title">Weather history</h3>
        <div class="vc-history-contents"></div>
        <h3>Weather forecast</h3>
        <div class="vc-forecast-contents">
        </div>
    </main>
</body>
</html>
We then have an associated CSS file to give the HTML a little styling. Again we keep things simple to make sure we are focussing on the mechanics of the integration code.
 html,
 body {

 }


.vc-flex-vertical {
    display:flex;
    flex-direction: column;
    justify-content: left;
}
.vc-margin-top {
    margin-top: 20px;
}
.vc-padding-top {
    padding-top: 20px;
}
.vc-small {
    font-size: 0.8em;
}
Step four – read the selected message and display the weather data
We are now ready to write the JavaScript code to integrate the Outlook message information with the weather API and then renders the display. To keep the code shorter, we are using jQuery for handling some HTML manipulation tasks such as event handler bindings and HTML modification.
First we handle the integration with the Outlook message and Office Javascript API. We set up a method that will update the message location and date information into the text boxes when the messages is opened (or a subsequent message is opened and the user has ‘pinned’ the taskbar).
We also bind some event handlers to detect if the user changes the location or date textboxes manually. When the user makes a manual change, a request is made to update the weather data.
Office.onReady(info => {
  if (info.host === Office.HostType.Outlook) {
    document.getElementById("sideload-msg").style.display = "none";
    document.getElementById("app-body").style.display = "flex";

    // Set up ItemChanged event to update the weather if the selected message changes
    Office.context.mailbox.addHandlerAsync(Office.EventType.ItemChanged, function(e) {
      update();
    });

    update();

    $(".vc-address-input").bind('input propertychange', function() {
      updateWeatherData();
    });

    $(".vc-forecast-input").bind('input propertychange', function() {
      updateWeatherData();
  });
  }
});
export async function update() {
  // Get a reference to the current message
  var item = Office.context.mailbox.item;
  var addresses = item.getEntities().addresses;
  var contacts = item.getEntities().contacts;

  var addressInput=document.getElementsByClassName("vc-address-input")[0];
  var dateInput=document.getElementsByClassName("vc-date-input")[0];
  var possibleAddress=null;


  if (addresses && addresses.length>0) {
    possibleAddress=addresses[0];
  } else if (contacts && contacts.length>0) {
    var contact=contacts[0];
    if (contact && contact.addresses && contact.addresses.length>0) {
      possibleAddress=contact.addresses[0];
    }
  }

  if (possibleAddress) {
    addressInput.value=possibleAddress;
  } else {
    addressInput.value="";
  }

  if (item.dateTimeModified) {
    dateInput.value=formatDate(item.dateTimeModified);
  }

  updateWeatherData();

}
The update function attempts to read the address and date information from the selected mail item. It reads any addresses that Outlook detects in the message. If that fails it looks to see if the message was sent from a known contact. if that fails the location textbox is set to empty. Similarly the date is set from the message ‘dateTimeModified’ property. The formatDate helper function formats the JavaScript data in yyyy-MM-dd format.
Finally, a request is made to update the weather data.
var updateWeatherData=(function() {
  var timerHandle;

  return function() {
    clearTimeout(timerHandle);

    timerHandle=setTimeout(function() {
      _refreshWeatherData();
    }, 1000);
  }
})();

function _refreshWeatherData() {
  $(".vc-history-contents").html("Loading...");
  $(".vc-forecast-contents").html("Loading...");

  var addressInput=document.getElementsByClassName("vc-address-input")[0];
  var dateInput=document.getElementsByClassName("vc-date-input")[0];
  var location=addressInput.value;

  var date=dateInput.value;

  refreshMessageWeatherData(location,date);
  refreshMessageWeatherForecast(location);

}
The method ‘updateWeatherData’ is responsible for debouncing requests to update the weather data. This debouncing prevents small changes to the address, date etc from causing the weather data to be requested too frequently. After one second of no additional changes, the _refreshWeatherData method is called to actually process the weather data update.
The _refreshWeatherData method reads the location and date information from the two text boxes and then submits to the two calls to retrieve the weather data and render the HTML.
refreshMessageWeatherData retrieves the historical weather data on the day the message was sent.
function refreshMessageWeatherData(location, date) {
var uri=`https://weather.visualcrossing.com/VisualCrossingWebServices/rest/services/timeline/${location}/${date}?unitGroup=${unitGroup}&key=${apiKey}&include=obs`;
if (!location) {
$(".vc-history-contents").html("Please enter a location");
return;
}
if (!date) {
$(".vc-history-contents").html("Please enter a date");
return;
}
$.get(uri, function( rawResult ) {
if (!rawResult || rawResult.errorCode) {
$(".vc-history-contents").html(`Error loading data: ${rawResult.message || rawResult}
`);
return;
} else {
}
var day=rawResult && rawResult.days && rawResult.days[0];
if (!day) {
$(".vc-history-contents").html("No weather data available");
return;
}
$(".vc-history-title").html(`Weather history for ${day.datetime}`);
$(".vc-history-contents").html(`Max: ${day.tempmax}
Min: ${day.tempmin}
Precip: ${day.precip}`);
});
}refreshMessageWeatherForecast retrieves the weather forecast for the message location.
function refreshMessageWeatherForecast(location) {
if (!location) {
$(".vc-forecast-contents").html("Please enter a location");
return;
}
var uri=`https://weather.visualcrossing.com/VisualCrossingWebServices/rest/services/timeline/${location}?unitGroup=${unitGroup}&key=${apiKey}&include=fcst`;
$.get(uri, function( rawResult ) {
if (!rawResult || rawResult.errorCode) {
$(".vc-forecast-contents").html(`Error loading data: ${rawResult.message || rawResult}
`);
return;
} else {
}
var days=rawResult && rawResult.days;
if (!days) {
$(".vc-forecast-contents").html("No weather data available");
return;
}
var html=""
days.forEach(function(d) {
html+=``;
});
html+="Date Max Min Precip ${d.datetime} ${d.tempmax} ${d.tempmin} ${d.precip}
"
$(".vc-forecast-contents").html(html);
});
}
This completes the code! This is a very simple example but it shows how easy it is to create a custom flow in a tool such as Microsoft Outlook. If you run a weather-dependent business, having the weather data available directly when reading a an email from a client is an invaluable time saver.
Do you need to integrate weather data into Microsoft Office – all the major tools such as Microsoft Excel, Word, PowerPoint support similar add-ins.