

While it is very easy to run weather queries using HTTP GET requests, there are times when it is preferable or even necessary to use HTTP POST requests instead. While HTTP POST requests are a little more complicated to configure and execute, they are well within the reach of any modern script or language. Also, since the weather results are returned with the same format options in both cases, you can reuse existing parsing and analysis code without change. In this article we’ll discuss the pros and cons of HTTP POST, when you need to use it, and how to do so easily.
What is the difference between HTTP POST and HTTP GET?
While both HTTP POST and HTTP GET use the same HTTP network infrastructure, the main difference is how they transmit query parameters. As you are likely already aware, HTTP GET requests simply put weather query parameters directly into the query URL. Aside from making the URL more difficult to read and debug, long URLs risk hitting their maximum length constraint. The official maximum length is 2048 characters, however some systems have an even lower limit. So it is a best practice to avoid getting even near that 2048 length limit.
HTTP POST solves the URL parameter length problem by placing the parameters into the request message body instead of on the URL itself. This means that the parameters of a POST query can have a practically unlimited length. This also makes the URL itself clean and easy to understand. However, part of the simplicity of URL-based APIs is that they can be tested from any browser and the queries easily constructed. While HTTP POST queries do limit this somewhat, as we’ll show below this is not a significant limitation, and in some cases the rewards far outweigh the minor additional complexity.
When should I use an HTTP POST weather query?
HTTP POST must be used when the total URL length including parameters is at risk of getting near the URL limit of 2048 character limit. In the case of weather queries, the main cause of this is the number of locations. When you are querying the weather for many locations in a single request (legacy endpoints only, not applicable to the Timeline API), you can easily exceed a reasonable URL length.
POST queries are also generally considered to be a bit more secure than GET queries. Since the Visual Crossing Weather API always uses SSL via HTTPS, the entire URL is encrypted before being passed to the server. However, depending upon how the query is being executed, it is possible that the client may store, log, or cache the URL in plain text. In this case, the parameters may be exposed in unexpected ways. In practice, however, this is a rarely a real concern, and the client is within full control of protecting against this issue.
Even when not requested, the practical benefits of using HTTP POST queries can be significant in certain situations. These benefits accrue from the ability to keep the query parameters completely separate from the query URL and script/code itself. Consider a script or tool that needs to run a series of weather queries. Each query could be defined by its own parameters file. That would allow the parameters to be kept completely separate from the script/code and also allow the parameters to be easily edited in plain text. In fact, the people who edit the parameters files need not be technical or have knowledge of coding at all. Implementing weather queries this way ensures maximum flexibility with only the small overhead of using HTTP POST. This is quite valuable in some weather use cases.
How do I use HTTP POST to query weather data?
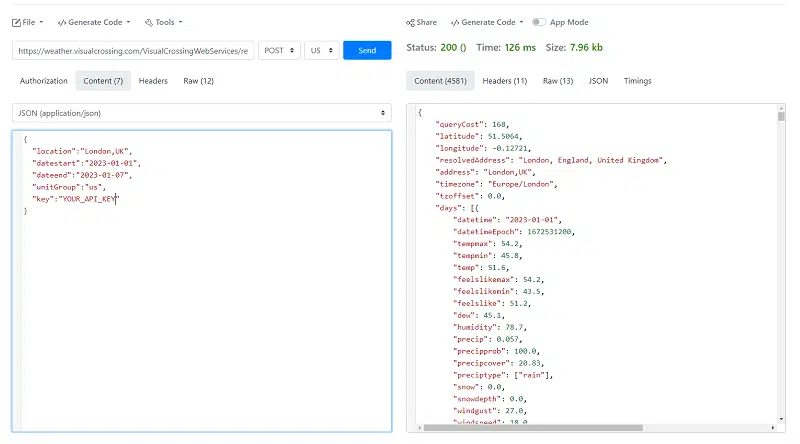
As we’ve discussed, the primary difference between POST and GET queries is that POST queries keep the weather query parameters separate from the URL. So the first step in making an HTTP POST weather query is to place the parameters into a separate file. If you are using the Visual Crossing Weather web-based query interface, you can go to the the API page and view the parameters with the “raw” option (after selecting post). If you are writing the query outside of the query page, simply write the parameters as normal and place them into this separate file. (Note that, depending upon your query plans, you may need to URL encode the parameters.)
The base URL and the path is the same whether you are using GET or POST queries. So, you don’t need to use a different API endpoint. If you are using the web-based weather query interface, the base potion of the URL is also provided on the API page. Otherwise, simply take your existing GET URL and remove the parameters at the end. We’ll need both this base URL and the parameters file when run the query below. Also, as mentioned above, the weather result data is the same regardless of whether you are using a GET or POST request. So any code that you already have for parsing and processing weather results using a GET request will be completely reusable after changing to POST.
Testing an HTTP POST weather query
One of the easiest ways to test your HTTP POST weather query is via an HTTP POST test page. There are several available on the internet, and one of the easier-to-use ones is https://reqbin.com/. On this page you can enter your base URL and parameters into text boxes and the page execute the request for you. You can see exactly what is being sent in the request and instantly make changes if something is not working correctly.
Running an HTTP POST weather query in cURL
cURL is a very common, open source, command-line tool that allow you to easily fetch data from URLs via HTTP. It is already installed on most Unix and Linux environments and on recent versions of Windows. (If you need to download it for an older Windows installation, you can find the download here: https://curl.haxx.se/download.html.) cURL makes it almost as easy to run POST queries as it is to run GET queries. Simply follow these steps:
- Place the file containing the parameter list in a known location on your machine.
- Identify the base URL for your query.
- For timeline queries – https://weather.visualcrossing.com/VisualCrossingWebServices/rest/services/timeline
- For forecast queries – https://weather.visualcrossing.com/VisualCrossingWebServices/rest/services/weatherdata/forecast
- For history queries – https://weather.visualcrossing.com/VisualCrossingWebServices/rest/services/weatherdata/history
- Run a command like this from your command prompt
- curl –o WeatherData.csv -d @Parameters.txt <BASE_URL>
- Where “Parameters.txt” is your parameters file.
- Where “<BASE_URL>” is the base query URL.
- And where “WeatherData.csv” is file into which cURL will place your result data.
- An example command-line would look like this:
- curl –o WeatherData.csv -d @Parameters.txt
- https://weather.visualcrossing.com/VisualCrossingWebServices/rest/services/timeline
Running an HTTP POST query in Python or Java
The process is very similar to run a HTTP POST query in Python or Java. You can choose to read the parameters from a file or construct them in your code or use a combination of the two for flexibility. In Python 3, you can use code like this to send an HTTP POST request without any 3rd-party dependencies.
from urllib.parse import urlencode
from urllib.request import Request, urlopen

url = 'https://weather.visualcrossing.com/VisualCrossingWebServices/rest/services/timeline'

post_params = {'location=Herndon,VA&datestart=2023-01-07&...'}

request = Request(url, urlencode(post_params).encode())
weather_json = urlopen(request).read().decode()
print(weather_json)
You can also consider using the popular Requests package instead as it contains additional functionality that makes working with URLs and HTTP queries easy.
Although you can also send POST requests using Java standard networking layer as well, it is a little more complex. A library such as the open source Apache HttpClient makes the process much easier to implement and understand. For the sake of complexity and space, we’ll omit the code sample for basic Java and various code samples can be found within the HttpClient documentation. So, there is plenty of content already available to ensure that you can make your HTTP POST queries work easily in Java also.
Summary
Knowing when to use HTTP POST instead of GET typically comes down to two things: length of the parameters and the design of the script or tool that is using the query. If the total length of your weather query parameters is near 2048 characters, you must use HTTP POST or risk errors. Alternately, if you are building a tool or script that benefits from keeping the weather query parameters separate from the base URL and script itself, then POST queries may work very well. While POST queries are a littler hard to configure and debug, the effort is well worth the benefit in certain use cases.
If you need more details about using weather queries or would like information on weather data in general, please check out our resource library or reach out to our weather experts. We’ll be happy to help you get the weather data that you need.